Ever wondered how a simple digital file gets transformed into a killer, durable design on your favorite shirt? Let’s pull back the curtain on the screen printing process step by step. It’s the undisputed champion for anyone needing bulk apparel, and at TShirtEnvy, we’re geared up to show you exactly why it’s the go-to for turning a great idea into a tangible product that actually lasts.
From Digital Idea To Tangible Design
Screen printing isn’t just a printing method; it’s a genuine craft that our team has perfected to deliver unmatched speed and quality. It’s what takes a creative spark and turns it into a professional, wearable piece of art. This is the trusted process for everything from corporate event gear and small business merch to band tees and school spirit wear, all produced with the reliability your brand deserves.
Why does everyone come back to it? Simple. Screen printing delivers unmatched durability and color that pops, especially when you’re ordering in bulk and need to keep an eye on the budget.
Here at TShirtEnvy, we’ve honed this process to a fine art, blending old-school techniques with modern speed. Our whole operation is built to bring your vision to life, whether you’re a seasoned pro ordering new uniforms or a first-time creator launching an apparel line. We inspire creativity by making it painless to get a final product that makes your brand look exceptional.
The Evolution of a Powerful Process
This method has been around the block—it’s an art form with a serious history. The roots of screen printing go all the way back to ancient China around 200 BCE, where artists used stencils cut from silk to press ink onto fabric. It really took off commercially in the 1930s with the first multi-color rotary screen printing machine, and by 1962, it had taken over the U.S. custom T-shirt game.
Today, screen printing accounts for over 70% of all promotional apparel prints. That makes it a major player in a market that pulls in over $5 billion a year. If you’re interested, you can dive deeper into screen printing’s fascinating history and its modern applications.
A Streamlined Journey from Concept to Delivery
Our main job as an industry leader is to take this powerful, sometimes complex, process and make it dead simple for you. From the moment you have an idea to the day a box of fresh shirts lands on your doorstep, we’ve optimized every single step for quality and speed.
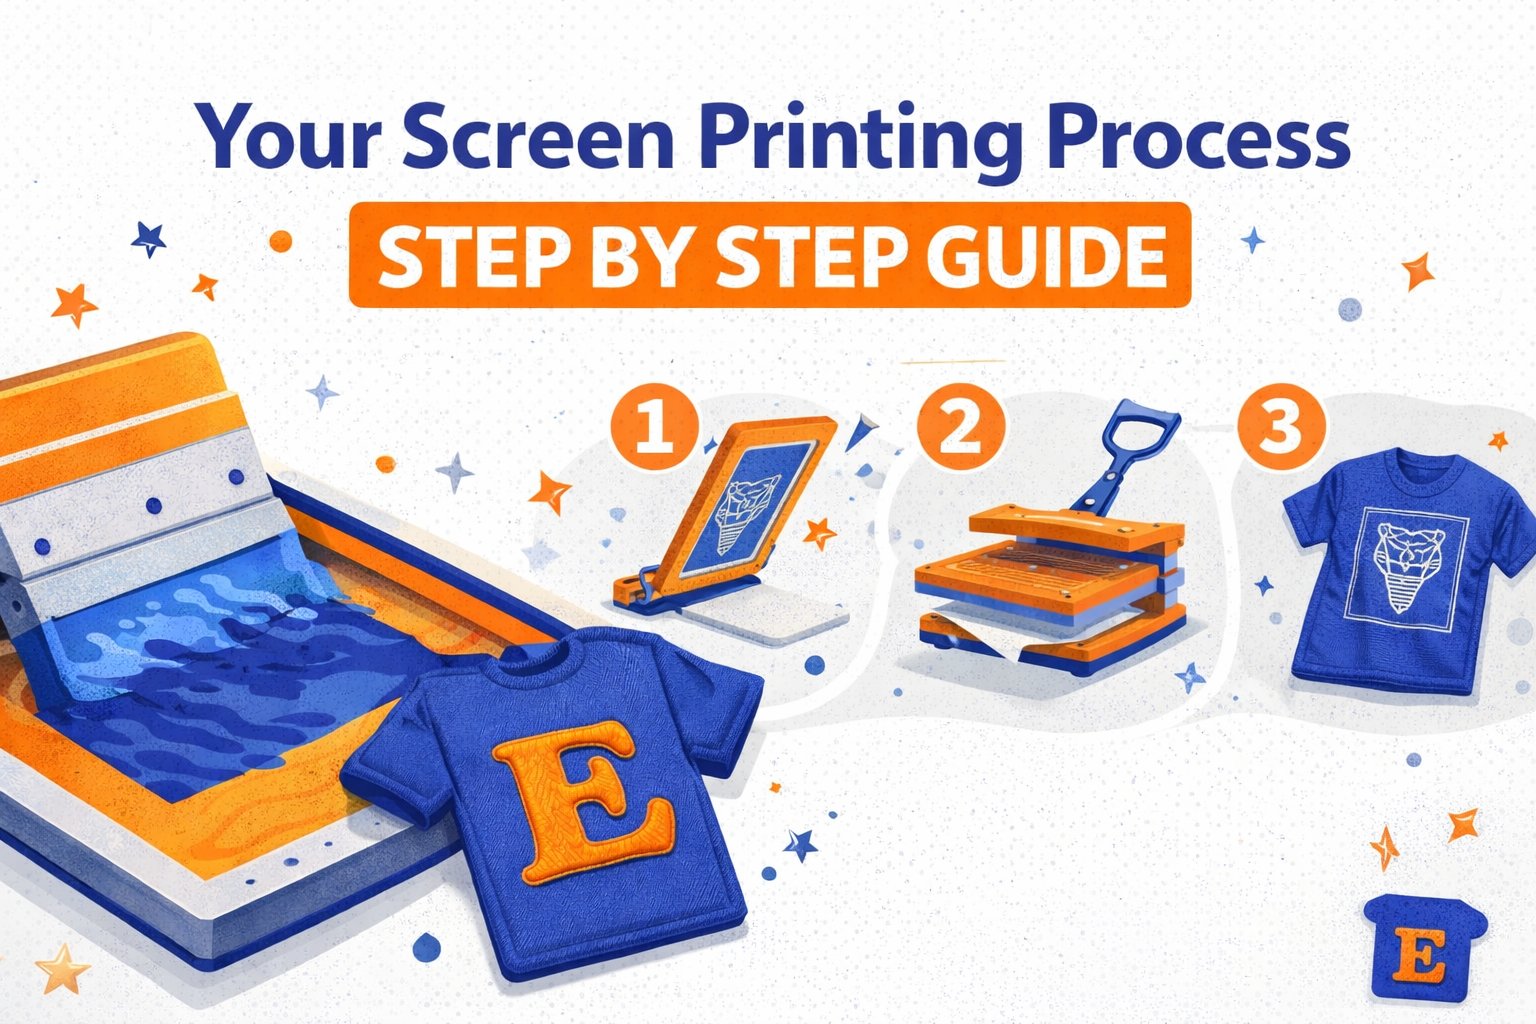
This is the core of what we do: a straight line from your idea to a high-quality print, delivered on time.

This entire journey is designed for pure efficiency, making sure we hit your deadlines without ever cutting corners on quality.
At TShirtEnvy, we don’t just see ourselves as a printer; we’re your production partner. It’s our job to take your concept, handle all the technical stuff behind the scenes, and make sure your design looks perfect on fabric. That’s the heart of our Quick, Quality, Printing!™ promise.
To make things even smoother, we’ve brought modern tech into this classic craft. You can upload a design, manage your bulk orders, and track your project’s progress right from the TSE mobile app. This mix of expert craftsmanship and digital convenience is what makes us different—it’s a reliable solution for anyone who needs premium custom apparel without the headache.
In the next sections, we’ll get into the nitty-gritty of each stage of the screen printing process.
Mastering Artwork and Screen Preparation
The secret to a flawless t-shirt print starts long before a drop of ink ever touches fabric. This is where precision becomes non-negotiable. In fact, our experience shows that nearly 85% of all print defects can be traced right back to poor artwork preparation. Getting this first stage right is the difference between a shirt that looks good and one that looks truly professional.
The entire screen printing process hinges on a perfect stencil, and that stencil begins with your digital design. For us, that means working with vector graphics whenever possible. Unlike pixel-based images (like JPEGs), vector files (.AI, .SVG, .EPS) are built on mathematical paths. This allows them to be scaled to any size without losing an ounce of sharpness—absolutely crucial for creating the crisp, clean lines that make a design pop.

Don’t have a vector file? No problem. Our in-house graphic designers are experts at converting and preparing any artwork to ensure it’s 100% print-ready. For a quick review from our team, you can easily upload any file type you have.
From Digital File To Film Positive
Once the artwork is finalized, the next step is creating film positives. Think of a film positive as a high-definition, transparent version of your design, printed in solid black ink.
Each color in your design gets its own separate film. For example, a three-color design for a school fundraiser—let’s say red, white, and blue—will require three separate films. This color separation process is what allows us to print each color layer with perfect accuracy. These films act as the blueprint for your screens, blocking UV light during the exposure process to create the stencil.
Coating And Exposing The Screen
With film positives in hand, we move on to the screen itself. A screen printing screen is a fine mesh stretched tightly over a rigid aluminum frame. We carefully coat this mesh with a thin, even layer of a light-sensitive liquid called emulsion. After it dries completely in our dark, climate-controlled room, the screen is ready for exposure.
The screen goes into a UV exposure unit with the film positive positioned on top. The powerful UV light hardens the emulsion everywhere except where the black ink of the film blocks it. This creates a durable stencil that can withstand thousands of impressions, making screen printing ideal for corporate and bulk orders.
Once exposed, we wash out the screen. The unhardened emulsion (the part covered by your design) rinses away, leaving open mesh areas that perfectly match your artwork. This is the gateway your ink will travel through to get onto the shirt.
Choosing The Right Screen Mesh
Not all screens are created equal. The mesh count—the number of threads per square inch—plays a huge role in the final print quality. Getting this right is a key part of our brand promise of fast turnarounds and high-quality results.
A lower mesh count means larger holes for more ink, while a higher mesh count has smaller holes for finer detail. Selecting the correct one is critical for turning your design into a high-quality print.
Choosing The Right Screen Mesh For Your Design
| Mesh Count Range | Common Use Case | Ink Type | T-Shirt Envy Pro Tip |
|---|---|---|---|
| 86-110 | Bold, simple graphics and athletic numbers. | Standard or Glitter | Perfect for laying down a thick, vibrant layer of ink on jerseys or promotional tees. |
| 156-160 | The all-around workhorse for a wide range of standard designs. | Standard Plastisol | This is our go-to for most corporate logos and event merchandise. It’s the sweet spot. |
| 200-230 | More detailed artwork with some finer lines. | Standard or Thinner | Great for when you need a softer feel (less ink) without sacrificing much vibrancy. |
| 305 | Highly detailed, photorealistic prints using halftones. | Thinner Viscosity | Reserved for super sharp edges and intricate designs. Not for the faint of heart! |
Our expert team handles these technical decisions for you, guaranteeing your design is translated flawlessly onto the garment. This meticulous preparation is the foundation of every successful print run, ensuring every shirt we produce meets the TShirtEnvy standard of excellence.
The Art Of Printing And Curing
This is where all the prep work really pays off. Your digital design is about to become a real, tangible thing on the press, and it’s a beautiful mix of art and mechanics. For any print with more than one color, this is where precision becomes everything.
After the screens come out of the exposure unit, we hit them with a pressure washer for about 2-5 minutes. This is a critical step. It blows out all the unhardened emulsion, leaving behind a crisp, clean stencil of your design. When you nail the emulsion-to-light ratio, you can get up to 95% edge sharpness.
For a multi-color job—think of a four-color band tee or a corporate logo—we go through this whole process for every single color. Each one gets its own screen. Then, we lock them all into the press and start making micro-adjustments, getting the alignment accurate down to 0.01 inches. Studies have shown this kind of precision can boost your final yield from a shaky 70% to a solid 98%. You can read more about why this matters in these screen printing process insights from Limitless Graphix.
This meticulous setup is how we at TShirtEnvy can handle anything from simple, single-color team jerseys to complex, full-color merchandise for school fundraisers and big events. The printing officially kicks off by loading up the screens with rich plastisol ink, which is the go-to for over 95% of professional apparel jobs because it’s so durable. We then flood the screen with ink and pull the squeegee across at a 45-degree angle, using consistent pressure from a 70-durometer blade to push the ink onto the shirt.
The Squeegee Stroke And Ink Application
With all the screens perfectly aligned, the first shirt gets secured to a platen—a flat board coated with a light tack to keep the garment from moving an inch. This is non-negotiable; any shift during printing would cause blurring and ruin the registration.
Next, we load the first screen with a healthy amount of plastisol ink. The printer does what’s called a “flood stroke,” which is a light pass with the squeegee to fill the open mesh of the stencil with ink. This just preps the design; it doesn’t actually print it yet.
The magic happens on the print stroke. With firm, even pressure, the squeegee is pulled across the screen again, this time pushing the ink through the mesh and onto the fabric below. The angle, pressure, and speed of this single motion are all carefully controlled to deposit the perfect amount of ink for a vibrant, consistent print. Every time.
Printing On Dark Garments And Flash Curing
Printing on dark-colored shirts is a whole different ballgame. It’s like trying to use watercolors on black paper—the colors just get lost and look muddy. To make sure your design pops with bright, opaque colors, we have to print a layer of white ink first. We call this the underbase.
This underbase essentially acts as a primer, creating a bright white canvas on top of the dark fabric.
The underbase is a non-negotiable step for achieving vibrant colors on dark apparel. Without it, the garment’s dark dye would mix with the ink, drastically reducing the design’s impact and vibrancy.
After printing the white underbase, you can’t just go ahead and print the next color on top of wet ink. That would create a smudged mess. Instead, we use a process called flash curing. The shirt passes under a flash cure unit for a few seconds, heating the ink just enough to gel it on the surface without fully curing it. This creates a solid, tack-free surface that’s ready for the next layer of color.
For a multi-color job, the sequence looks like this:
Print a color.
Flash cure.
Print the next color.
Flash cure again.
We repeat this methodical process, building the final image layer by layer until every color in the design has been applied.
The Final Cure For Lasting Durability
Once the last color is down, the job isn’t over. The ink might look perfect, but it’s not permanent yet. To really lock in the design and make sure it survives dozens of washes, the garment has to go through one last curing process.
Each shirt is carefully placed on a conveyor belt that carries it through a long, tunnel-like dryer. Inside, the garment is heated to a very specific temperature—for plastisol inks, that’s typically around 320°F (160°C). This final bake is what fully cures the ink, chemically bonding it to the fibers of the fabric.
This is what makes screen printing the undisputed champion for durable apparel like team uniforms, workwear, and event merch that needs to last. It’s a key part of our commitment to high-quality custom printing and ensures you get a product that not only looks great but holds up wash after wash. You can even manage your bulk corporate orders and track their production status—including the curing stage—right from the TSE mobile app.
Ensuring Quality With Final Inspections
A screen printing job isn’t done just because it comes off the conveyor dryer. The last part of the screen printing process step by step is where our commitment to excellence is really put to the test. This final stage is all about rigorous quality control and adding those professional finishing touches that take your apparel from good to great.

This is where T-Shirt Envy’s promise of reliability and customer satisfaction comes into full view. Every single garment gets a hands-on inspection from our team to make sure it meets our sky-high standards.
The Critical Quality Control Check
Before any shirt gets boxed up, it goes through a multi-point inspection. Our print experts are trained to catch even the smallest imperfections, guaranteeing that every piece in your order is consistent and flawless. This isn’t a random spot-check; it’s a comprehensive review of every single garment.
Here’s what our quality control team is looking for:
Registration Accuracy: We check that all colors are perfectly aligned, with no gaps or overlaps. This is especially critical for multi-color designs where even a millimeter of misalignment can ruin the entire look.
Color Vibrancy and Consistency: Our team compares the finished prints to the original design proof, ensuring the colors are bright, accurate, and consistent across the whole run.
Ink Opacity and Coverage: We’re looking for smooth, solid ink coverage with no pinholes or thin spots. On dark garments, we verify the underbase is doing its job and the colors are popping just right.
Cure Test: A simple but effective stretch test confirms the ink has been properly cured. If the ink cracks or flakes, it means it wasn’t cured correctly and won’t last in the wash—a defect we never let slide.
This meticulous attention to detail is how we back up our brand reliability. It’s an essential step that ensures the apparel you receive is ready for your business, event, or team.
A huge part of this is the curing process. Garments typically pass through dryers at 320°F for 60-180 seconds to properly set the plastisol inks used in over 90% of t-shirt jobs. In fact, industry analyses show that 70% of print defects trace back to improper curing, so precise temperature control is absolutely non-negotiable. You can dive deeper into the technical details of the screen printing process to see why this matters so much.
Retail-Ready Finishing Touches
For many of our clients—especially small businesses, creators, and corporate brands—presentation is just as important as the print itself. That’s why we offer a range of finishing services designed to elevate your apparel and get it retail-ready right out of the box.
These services save you valuable time and make your merchandise look polished and professional.
Popular Finishing Options:
Custom Tagging: We can remove the manufacturer’s tag and print your custom branded tag inside the collar. This small detail adds a high-end feel and reinforces your brand identity.
Folding and Bagging: Each shirt is professionally folded and individually placed in a clear poly bag. This not only protects the garment but also makes it easy to store, organize, and distribute.
Hang Tag Application: If you provide custom hang tags, we’ll attach them to each item for you. This is another great way to add branding, pricing information, or care instructions.
Whether you’re stocking a boutique or handing out swag at a trade show, these finishing options ensure your order arrives ready for action. You can even manage these add-ons and track your order’s final production stages directly through the TSE mobile app, making the entire process seamless. This is how we deliver on our promise of being the go-to solution for fast, reliable, premium custom apparel.
Choosing The Right Printing Method
We’ve just walked through the screen printing process step by step, and it’s easy to see why it’s such a powerful tool for creating amazing apparel. But is it the right choice for your project? The truth is, the best printing method always comes down to the details of your order. Our job isn’t just to print shirts; it’s to be your expert consultant, guiding you to the perfect solution.
Making the right call means looking at a few key factors: your order size, the complexity of your design, how many colors are involved, and the type of fabric you’re printing on.
When To Choose Screen Printing
Screen printing is the undisputed champ for bulk orders where durability and cost-per-shirt are the main priorities. There’s a reason it’s been the workhorse of the custom apparel industry for decades.
Choose screen printing for:
Bulk Orders: If you’re ordering 24 or more identical items, screen printing is your most cost-effective option. The setup is a one-time thing, so the cost per shirt drops dramatically as the quantity goes up. This makes it perfect for corporate events, merchandise, or school spirit wear.
Simple Designs with Limited Colors: Designs with one to six solid colors are screen printing’s sweet spot. Each color needs its own screen, so keeping the color count low keeps your setup costs down and speeds up production.
Maximum Durability: The plastisol ink used in screen printing cures into a thick, tough layer that bonds directly with the fabric. It can handle dozens and dozens of washes without cracking or fading, making it ideal for uniforms and workwear that need to last.
Vibrant Colors on Any Garment: Screen printing lays down a thick, opaque layer of ink. This is how you get incredibly bright, punchy colors that pop on both light and dark-colored garments.
When To Choose DTG Or DTF
What if your project doesn’t quite fit the screen printing mold? That’s where modern digital printing comes into play. Direct to Garment (DTG) and Direct to Film (DTF) offer incredible detail and flexibility, especially for smaller or more personalized runs.
Think of it like this: screen printing is like a traditional printing press, perfect for mass-producing thousands of newspapers. DTG and DTF are more like high-end inkjet printers, ideal for printing a single, high-resolution photograph. Both are powerful tools, but they’re built for different jobs.
DTG and DTF are the right fit when:
You Need Full-Color, Complex Artwork: For designs with photographs, subtle gradients, or a whole rainbow of colors, digital printing is the only way to go. It can reproduce millions of colors with photorealistic detail that screen printing just can’t match.
Your Order is Small: With no minimum order requirements, DTG and DTF are perfect for creating that one-off custom shirt for a gift or a small batch for a new clothing line.
You Want a Soft-Feeling Print: DTG ink soaks directly into the fabric’s fibers, especially on light-colored garments. The result is a print with a very soft, barely-there feel.
You Need Versatility: DTF transfers are incredibly versatile. They can be applied to a huge range of fabrics and items that are difficult or impossible to screen print, like hats, bags, and polyester jackets.
Screen Printing vs DTG vs DTF At A Glance
To help you visualize the differences, here’s a side-by-side comparison. Use this to decide which printing technology is the best fit for your project’s specific needs, budget, and timeline.
| Factor | Screen Printing | Direct to Garment (DTG) | Direct to Film (DTF) |
|---|---|---|---|
| Best For | Bulk orders (24+), simple designs, vibrant colors on darks | Small orders, photos, complex art on cotton | Any fabric, hard-to-print items, vibrant full-color |
| Feel | Thicker, durable layer on top of the fabric | Soft, breathable, ink soaked into fibers | Smooth, flexible film layer; slightly less breathable |
| Durability | Extremely high; lasts for years | Good, but can fade with many washes | Very high; resistant to cracking and peeling |
| Color Limit | Best for 1-6 colors; each adds cost | Unlimited colors, gradients, and photos | Unlimited colors, gradients, and photos |
| Cost | Low per item on large runs, high setup cost | Moderate per item, no setup cost | Moderate per item, no setup cost |
Each method has its place, and choosing the right one ensures you get the best possible result for your investment.
Still not sure which way to go? That's why we built a smart recommendation tool right into the TSE mobile app. Just upload your design, and the app will instantly analyze your artwork and quantity to suggest the best, most budget-friendly printing method. If you'd like to dig deeper before ordering, we also have a detailed guide on choosing the right printing method that breaks down the pros and cons even further.
It’s Time to Start Your Project
Now that you’ve gotten a real look at the screen printing process step by step, you know exactly what goes into creating durable, professional-grade custom apparel. You've seen the craft behind the quality, from prepping the art to the final cure.
The next step? Bringing your own idea to life.
At TShirtEnvy, we live and breathe this process. We blend that proven, hands-on craftsmanship with high-speed, modern tech to deliver on our promises every single day. We’re obsessed with creating apparel that builds brands, unites teams, and makes your events unforgettable. This isn't just a job for us; it’s our passion.
Turning Your Vision into Reality
Our entire shop is built around what our clients need most: lightning-fast turnarounds, consistently amazing results, and a seamless process for orders of any size. Whether you're a small business needing new uniforms, a creator launching a merch line, or an event organizer on a tight deadline, we’ve got your back.
Getting started is simple. You don’t need to be a print expert—that’s our job. All you need is an idea.
We believe great ideas deserve great execution. Our team is here to be your expert partner, ensuring a smooth, hassle-free experience from the moment you send us your design to the day your order arrives at your door.
Ready to see why so many businesses and creators trust us with their custom apparel? We invite you to experience Quick, Quality, Printing!™ firsthand.
Let’s make something incredible together. You can get your project rolling in minutes by downloading the TSE mobile app to create your design and track everything on the go. If you're ready to dive in right now, you can also easily get a quote for your custom order on our website.
Your Screen Printing Questions, Answered
When you're diving into a custom apparel project, questions are a good thing. They mean you care about the final product. We get a lot of the same great questions from clients, so let's clear them up right now to make sure you feel totally confident in the process.
Is There a Minimum Order for Screen Printing?
Screen printing really shines on larger runs. We've found the sweet spot starts at 24 pieces. Because each color in your design needs its own dedicated screen and setup, the cost per shirt drops dramatically as the quantity goes up. It's the perfect method for group orders, events, or merchandise runs.
What if you just need a few shirts? No problem. For smaller batches or one-off designs with no minimums, we’ll usually point you toward our DTG or DTF printing. The Get A Quote page on T-Shirt Envy's website is a great tool for getting an instant quote and comparing options to see what makes the most sense for your budget.
How Long Does a Bulk Screen Printing Order Take?
Our standard turnaround is already one of the fastest out there. But we all know that sometimes, "fast" isn't fast enough. For those moments when you're up against a tight deadline, we offer rush services, including 1-hour, same-day, and 24-hour production.
The exact timing always depends on the order size and how complex your artwork is. The best way to get a solid estimate is to check our website or the TSE mobile app, where you can also track your order’s progress in real-time.
Can I Bring My Own Shirts for Printing?
Absolutely! We're more than happy to print on garments you provide.
A pro-tip from our years of experience: For the best and most durable prints, stick with 100% cotton or blends with a high cotton content. These fabrics are champions at absorbing screen printing ink, which leads to a vibrant, long-lasting design. If you're not sure if your apparel is a good fit, just ask. Our team can give you expert advice to make sure we get a perfect print.
How Should I Prep My Artwork for the Best Print?
To get those razor-sharp lines everyone wants, vector files are the gold standard. Formats like .AI, .EPS, or .SVG can be scaled to any size without getting blurry or losing a bit of quality.
But don't stress if all you have is a .JPG or .PNG. Our in-house graphic designers are wizards at this stuff and can help convert your file and get it ready for printing. You can send any file type right through the TSE mobile app for a quick, expert review.
Ready to get started? Experience the difference with T-Shirt Envy. Start your custom order today and let's create something amazing.


